Tuesday, March 29, 2011

Paper Mache Massacre

Paper mache is a simple craft that can turn any day into a craft extravaganza. All you need is flour, water, newspaper, and an imagination. I recently saw a paper mache basket at a gift shop selling for $15.00. Seriously? $15.00? I hadn't tried my hand at paper mache since high school, but a quick internet search produced several recipes and the easiest one to create was a no cook recipe using flour, water, salt, and a little pinch of cinnamon. The flour and water (one part flour to two parts water) create the paste while the salt (a couple tablespoons) will deter mold. The purpose of the cinnamon? Merely sensory. The cinnamon provides a pleasant smell to the otherwise bland paste.

With little preparation I found myself sitting at my kitchen table ready to mache. I mixed up the homemade glue, found a couple molds for my baskets, ripped up last week's edition of The Mountain Eagle, and I was ready to craft. At least I thought I was ready to craft. Three days in and I've found paper mache a lot messier than I remember and it's been a lot of trial and error... more error than anything. Oops!  :)

Bear in mind that these Easter baskets are a work in progress, an experiment that I will tweak as time goes on. The first run provided a couple rough looking baskets, and while the rough edges can definitely be appreciated from an artsy stand point, I'm sure as I play with the mache I will find a better technique to create a more flawless look. Then again there's always sandpaper which absolutely can be used on paper mache. It's dries a lot stronger than one might think. Shall we look at some steps?


Make sure when you mix your homemade paper mache paste that the mixture is as smooth as possible. I used my handy whisk to remove any remaining lumps. You want the mixture to be thinner than glue and quite runny. Play with the recipe and find the consistency that is best for you. One of the molds I used was an old terracotta flower pot. I covered the pot in a thin layer of petroleum jelly to make the paper mache cast easier to remove.

The second mold I used was a small metal pail. Again I covered the pail in a thin layer of petroleum jelly. Ideally you should only do one layer of paper mache at a time. The first night I allowed the layer to dry overnight, but I realized that process was going to take forever and I devised a plan.....

I took the molds and laid them on top of our electric heater. You definitely don't want to leave them unattended as paper and heat can create fire, but I monitored the molds and before I knew it the new layers were completely dry! Think about it... both terracotta and metal are conductors of heat so laying them on top of the heater basically "baked" the paper mache layers.  Pretty neat right?

Even with the small layer of petroleum jelly on the molds the baskets still needed to be slit down the back for easy removal. Once the baskets have been removed from the molds you simply take a few more layers of newspaper to close the cut. These baskets are 4 layers thick and as you can clearly see they stand on their own and hold their shape quite well. Now all that's left to do is decorate the baskets and surprisingly this has been the trickiest part for me.

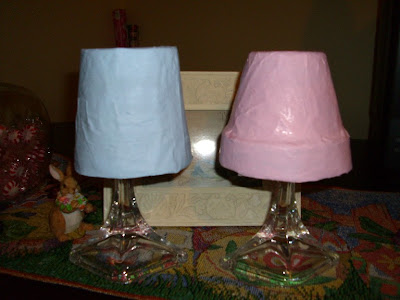
First I painted the baskets in pretty pastel colors. The first two I painted baby blue and pale pink. Don't they look like little lampshades while hanging over my candle sticks to dry?   :)

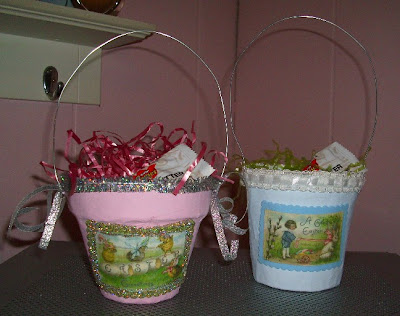
Hmmm. I'm very undecided about them. I guess it's "cute" but it's not what I was looking for. Of course, this is only my first and a quick shopping trip may produce some new ribbon and embellishments. I used what I had on hand and I can't say I'm feeling it very much. The handle is wire, but it needs something... ribbon? flowers? beads? Hmmm. I shall ponder it.

On my second attempt I decided to go a little more bare. Not so much glitter. Not too much frill. I'm still not feeling it. I definitely love my vintage Easter images... that part is working for me... but the overall effect is not quite pleasing me. I think this might be my first self-proclaimed craft fail. I'm on the fence.

Side by side. I'm still undecided. I don't love them, but I don't hate them. I feel they are "unfinished" but adding to them could border on tacky. Perhaps a craft shopping trip can inspire me. I need stuff, but I'm not exactly sure what kinda "stuff" I need. I thought this paper mache project was going to be a breeze. Uh... not so much. Anyone have any ideas? I'm open to suggestions. Help!




Tuesday, March 22, 2011

Easter Doo-Dad

Yesterday was primarily a waste of what could have been useful time and I spent most of the day staring at various craft supplies and pondering craft inspirations. As the sun was beginning to set I finally got around to actually making something and not just thinking of making something. I wasn't sure what to call my creation since it doesn't serve any real function. It's basically just a pretty.... a doo-dad as the old folks might call it.

I know you're asking yourself the same thing I've been asking myself. "So, what is it again?" A day later and I'm still not sure. I took an empty ribbon spool, some craft foam, fine glitter, some pink Easter grass, and a few Victorian images I found online and created a little Easter pretty. I suppose its sole function is to sit and be pretty. People buy porcelain what-nots for the same purpose so why not create a craft that has no purpose other than to be pretty. Here's the finished doo-dad, whatnot, what have you....


I don't know why, but the the curled ribbon looks coral in the above picture. It isn't. It's a deep rose pink color which can be seen in the following photo. I tried several different settings on my camera to take photos of this doo-dad, but most settings produced a blurry image and the only setting that didn't discolored the ribbon. Putting both images together should be able to give you a better mental image of the actual coloring of the craft. I'm beginning to think it's time for a new camera.


So while it serves no real function I think it can still be appreciated for artistic effort. What could have turned into a major craft fail morphed into an actual craft. So what if it doesn't open to reveal little secrets inside. This is the little craft that could. The little craft that didn't need any surprises. It's just pretty. It doesn't need to be anything else.

Thursday, March 17, 2011

Mountain Dew Goodness.

Happy St. Patrick's Day! Instead of celebrating with green beer, or a funky green colored dessert, I thought I would try my hand at a simple recipe I found in a local fund raising cookbook. You do know what I'm talking about, right? Local churches and organizations gather recipes from members and sell their not-so top secret recipes as a fund raising project. Whether it be for the church youth group, or a Relay for Life team, those little cookbooks always find themselves a home inside my mom's vast collection of cookbooks. If you're looking for the good stuff your best bet is to skip the Better Homes and Gardens cookbook edition and go straight for a local church cookbook. They are my absolute favorite. I photocopied the recipe a while back, and cannot remember the exact cookbook I got the recipe from, but I do remember it being a local church group. From the build-up one might think I've just created the most elaborate masterpiece ever to come out of an electric oven, but it's just a very simple recipe. Presenting the Mountain Dew Cake.

Fresh out of the oven.


Here's the easy as pie recipe:

1 box lemon cake mix
1 small box lemon instant pudding
4 eggs
3/4 c. oil
1 12 oz. can of Mountain Dew

Preheat oven to 350 degrees. Mix together first four ingredients. Mixture will be very thick. Add the Mountain Dew and mix very well. Mixture will be quite thin now. Pour into well greased Bundt pan and bake 45 to 60 minutes. (My oven tends to run very hot and my cake was cooked perfectly after 48 minutes, but as always adjust time according to your own oven. Trial and error.)

I suppose to further celebrate St. Patty's Day I could have added a little green food coloring to the cake batter and although experts claim you can't taste the food coloring I tend to think it does slightly alter the taste. I'm sure it's my imagination and it's simply the color tricking the brain, but I didn't want to risk it. The way I see it the Mountain Dew can is green so it's a perfectly acceptable St. Patrick's Day dessert on that premise alone.

One could make a lemon glaze to cover the cake, but I opted to sprinkle the cake with a nice layer of powdered sugar. It ultimately comes down to baker's preference since both options are good. :) The Mountain Dew appears to give the cake a moister and slightly sticky texture, but the taste is really no different than that of a regular lemon pound cake. I suppose it's a good thing I like lemon pound cake.

Yum-O. Warm lemon goodness smothered in powdered sugar.


So how did you celebrate on this fine St. Patrick's Day? Green beer? Green eggs and ham? Or corned beef and cabbage? My mom actually made the latter and from what I understand it's a traditional Irish meal. I had tacos... the extreme opposite. :) However, my dessert was slightly more St. Patrick's Day appropriate. Remember... the Mountain Dew was in a green can. :) Enjoy the rest of your St. Patty's Day and if you're having green beer, have one for me.... Cheers!

Saturday, March 5, 2011

Easy Peesy.

This is quite possibly the easiest craft I've ever made and it's all because of the greatest little crafting tool ever created... the Cricut! Anyone that likes crafting and/or scrapbooking needs a Cricut. Those little machines are monsters and if you're willing to invest in the different cartridges then I promise you will not be disappointed. Think of all the money you already spend on backgrounds, borders, and stickers... well the Cricut makes all of that and more, but this isn't an ad for the Cricut. This is a craft blog so let's get on to the craft.

I had purchased a small Easter tree at the Dollar Tree about a month ago. I wanted to get them before they sold out, and lo and behold, the last time I was in the Dollar Tree they only had a handful left and they looked pretty bad so I was happy with my impulse Easter purchase well before Valentine's Day. The Dollar Tree provided glitter foam egg ornaments, that are very cute in their own right, but I wanted something a little different for my tree. I already decorate a larger feather tree with egg ornaments for Easter and keeping with my love of all things Victorian I went to the Cricut with an idea in mind. Luckily we had a cartridge with a tag design I rather liked and thought would fit well with the Victorian theme. I cut all the layers on the Cricut. White background, pink middle, and the white scrolling frame. Next I simply printed the Victorian images on plain printer paper and used an oval template to cut to the appropriate size. Here's the finished product....


They are very small and dainty, only 1 1/4 inch big, so I strung regular pink sewing thread through the top to make the hanger. The following picture shows the ornaments on the tree I purchased. I still may add a few foam egg ornaments, or some ribbon on the base, but I think for one dollar and a few odd cents it looks pretty good.


After egg and ribbon embellishments.
Before egg and ribbon embellishments.


Supplies Used:
1 small Easter tree from The Dollar Tree
1 package of foam glitter eggs from The Dollar Tree
Textured paper for ornament templates
Victorian images gathered from the internet
Ribbon removed from 1.00 candy package from Wal-Mart (Yes I bought the candy in question. LOL)
Cricut (Used to cut ornament layers)
X-Acto knife (Used to cut Victorian images for ornaments)
Glue stick (Used to assemble ornaments)
Pink sewing thread

Top o' the morning to ye!

I have decided, after much careful consideration, that I will not be posting progression photographs with all my craft projects unless I happen to obtain followers that are looking for step by step instructions on how to create some of the things I make. I know my blog is in its infancy, and I shouldn't expect to have a ton of followers since my blog is centered around Victorian crafts and antiques, but perhaps as time goes on I might gain a small following and someone may ask for instructions for the crafts I create. At that time I will happily start with the progression photos again, but until that time I find it easier to sit down and complete a craft project, start to finish, without having to stop after every step to take a photo. And in all honesty the crafts I create are so simple that I can easily explain the steps when showing the finished project.

First I want to share an update to an earlier craft I made, my Easter tussie mussie. The more I looked at the pictures, the more I noticed that something seemed "off." It was almost as if the tussie mussie was lopsided. In person it wasn't as noticeable, but in pictures the off center rose at the bottom didn't seem to complete the look in a balanced way so I simply added two leaves. Just those two leaves made all the difference and gave the tussie mussie a more balanced look.


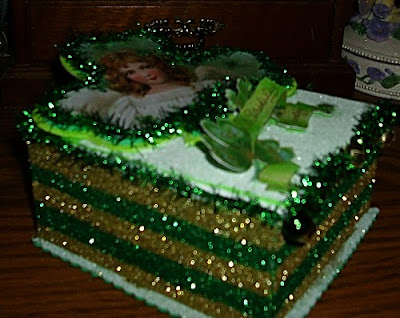
As a fan of holiday decorating it never occurred to me to create something for St. Patrick's Day. Sure, it's a fun holiday that involves pinching and green beer, but when it comes to decorating ol' St. Patrick doesn't get many options. Some people decorate for St. Patty's Day parties, and it's always a fun day at the office, but at home it's really a forgotten holiday so I decided to create something special just for St. Patrick's Day. No tussie mussie this time. St. Patrick's Day was getting its own personal, one of a kind, craft. Presenting the 'Pot O' Gold' trinket box.


I started with a plain white crafting box that can be purchased at any crafting store. Mine was similar to the one shown, but slightly smaller.


To start I covered the bottom edges with fine crafting glitter. I began with a light base coat in light green and went back to add contrasting stripes in a pretty Kelly green and vibrant gold.


For the bottom I simply cut a piece of green crafting foam using decorative scrapbooking scissors. The foam was peel and stick so all I had to do was remove the backing, stick it to the bottom of the box and contrast the edge with fine white glitter. Some of the gold and green fell onto the edge, but it adds overall depth and character. I'm not afraid of a little boo-boo here and there in crafting.

On the lid of the box I cut a piece of green foam and adhered it to the top. I also covered the top in the fine white glitter to create a contrasting decorative base for my decorations. (FYI: I'm not really a fan of undecorated foam in crafting. It comes in handy to add dimension, but it can also look cheap so I always embellish crafting foam for a more finished look.) I lined the top edge of the box with small green tinsel that was left over from Christmas, hot glued two bells, one gold and one green, to the center of the lid for easy opening. To add further contrast I glued two bells to each front corner of the box as well which you can kind of see here. Sorry it's sort of blurry.


For the lid I first cut two contrasting shamrocks from two colors of green foam to add a three dimensional look. On the top shamrock I added a Victorian image I found online that I printed on the textured paper I've mentioned in past blogs. Because the textured paper is matte in appearance I simply painted a thin layer of Mod Podge on the image to create a shiny appearance. I lined the image on the shamrock with green tinsel. The bottom St. Patrick's Day banner was also found online, printed on the same textured paper, given one layer of Mod Podge, and cut out using my handy X-Acto knife. I used adhesive mounting squares I found at the Dollar Tree to lift the image from behind to create a 3D appearance. I did the same on the top back of the large shamrock and that last step concludes the making of the St. Patrick's Day 'Pot O' Gold' trinket box.