First I want to share an update to an earlier craft I made, my Easter tussie mussie. The more I looked at the pictures, the more I noticed that something seemed "off." It was almost as if the tussie mussie was lopsided. In person it wasn't as noticeable, but in pictures the off center rose at the bottom didn't seem to complete the look in a balanced way so I simply added two leaves. Just those two leaves made all the difference and gave the tussie mussie a more balanced look.
As a fan of holiday decorating it never occurred to me to create something for St. Patrick's Day. Sure, it's a fun holiday that involves pinching and green beer, but when it comes to decorating ol' St. Patrick doesn't get many options. Some people decorate for St. Patty's Day parties, and it's always a fun day at the office, but at home it's really a forgotten holiday so I decided to create something special just for St. Patrick's Day. No tussie mussie this time. St. Patrick's Day was getting its own personal, one of a kind, craft. Presenting the 'Pot O' Gold' trinket box.
I started with a plain white crafting box that can be purchased at any crafting store. Mine was similar to the one shown, but slightly smaller.
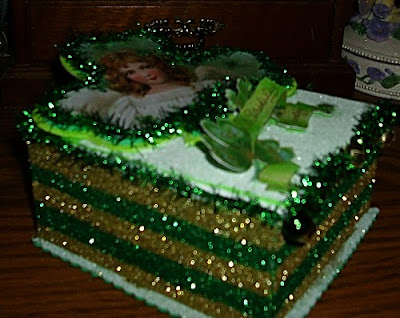
To start I covered the bottom edges with fine crafting glitter. I began with a light base coat in light green and went back to add contrasting stripes in a pretty Kelly green and vibrant gold.
For the bottom I simply cut a piece of green crafting foam using decorative scrapbooking scissors. The foam was peel and stick so all I had to do was remove the backing, stick it to the bottom of the box and contrast the edge with fine white glitter. Some of the gold and green fell onto the edge, but it adds overall depth and character. I'm not afraid of a little boo-boo here and there in crafting.
On the lid of the box I cut a piece of green foam and adhered it to the top. I also covered the top in the fine white glitter to create a contrasting decorative base for my decorations. (FYI: I'm not really a fan of undecorated foam in crafting. It comes in handy to add dimension, but it can also look cheap so I always embellish crafting foam for a more finished look.) I lined the top edge of the box with small green tinsel that was left over from Christmas, hot glued two bells, one gold and one green, to the center of the lid for easy opening. To add further contrast I glued two bells to each front corner of the box as well which you can kind of see here. Sorry it's sort of blurry.
For the lid I first cut two contrasting shamrocks from two colors of green foam to add a three dimensional look. On the top shamrock I added a Victorian image I found online that I printed on the textured paper I've mentioned in past blogs. Because the textured paper is matte in appearance I simply painted a thin layer of Mod Podge on the image to create a shiny appearance. I lined the image on the shamrock with green tinsel. The bottom St. Patrick's Day banner was also found online, printed on the same textured paper, given one layer of Mod Podge, and cut out using my handy X-Acto knife. I used adhesive mounting squares I found at the Dollar Tree to lift the image from behind to create a 3D appearance. I did the same on the top back of the large shamrock and that last step concludes the making of the St. Patrick's Day 'Pot O' Gold' trinket box.


No comments:
Post a Comment