Thursday, June 30, 2011

Here Kitty, Kitty....

For all the animal lovers out there this is a quick and easy project to make a treat jar for your beloved pet(s). I started with an old jar I already had around the house and used templates I found on another craft site for the paw prints and wording. I didn't like the cat images the craft site provided so I took matters into my own hands and found a Victorian image more to my liking. I also didn't have any spray adhesive on hand so I used a quick set tacky glue to secure the image to the glass jar and it worked perfectly.

Once I had the image in place I put two coats of Mod Podge on the image as a sealer. Using the templates I found online I taped the images to the inside of the jar and with a fine tipped pen traced the paw prints and wording onto the jar. Please allow proper drying time as it will take some time for the ink to dry on the glass surface. The entire project took less than an hour and was created from a jar I already had around the house! I loved the way the cat treat jar turned out so I intend to make another for dog treats as well once I find the perfect jar.

Finished product.

Here's the image I used.


Here doggy.....

  Treat jar for the dog.

Image I used for the doggie treat jar.

Yeah... my pets are pretty spoiled, but I wouldn't have it any other way.

Sunday, June 26, 2011

Baby You're A Firework....

Wow... I've definitely been a bad craft blogger for the past two months. Actually, I've been a bad crafter for the past two months. After Easter I really didn't have another holiday to create any decorations for, but that recently changed when I realized the 4th of July is upon us! It's not only been a lack of holiday's though. There have been some major happenings in the household lately. My mother was recently diagnosed with cancer so between the shock, chemotherapy, and anticipation of starting radiation I haven't had much time to think, much less create. However, one night while she was resting I remembered a craft I had seen a while back of a paper fire cracker and feeling inspired I got out my crafting paper, mod podge, and fired up the Cricut. Presenting Victorian Fireworks!

Although I didn't take progression photos (I know I promised, but I always get in the craft zone and forget) this project is very easy. All you need is card stock paper, glue, images of your liking, floral wire, and tinsel. I have already decided that this upcoming Christmas season I am going to load up on Christmas tinsel. I'm running out and Christmas is still 6 months away. What ever will I do!? Hopefully I'll make it to October which when shoppers usually see the first of many holiday items hitting store shelves.

Back to the fireworks.... First you form your wire to look like a firework smoke tail. The bottom needs to be a connected circle, for stability, and then you simply twist the remaining wire to create a spiral. Cover the wire in tinsel, so far I have used gold and silver, and viola! You have the smoke tail for your firework.

Next you take a piece of card stock paper and roll into a tube shape. Glue the back seam and let dry. Once dry you can decorate the tube with stripes or stars (as seen in the picture  below) and take a patriotic image of your choice and glue to the front. I happen to like Victorian images so I always use those. Once I have the image glued in place I like to add a layer of mod podge. One it protects the image, but it also makes the image pop with a hint of gleam. For the top cut a circle from your card stock paper and slice it to the middle. Roll the circle into a cone shape and glue to the top of the tube. Once the tube is completely dry you take the tinsel smoke tail and glue to the back inside of the tube. So far I've made two, but I intend to make a third, slightly smaller than the smallest one I have so far and then I will have a complete centerpiece that will look great at any 4th of July event I happen to throw or attend. Just wait until you see the dessert I have in mind. :) Hopefully it won't be another two months before I update again, but until next time.... Happy crafting!


Made the third and final firework this evening during a thunderstorm. Storms bring out my creative side. I think the three look very good together. Now I have a complete centerpiece!


Monday, April 25, 2011

Hoppy Easter!

Happy Easter readers! Like Christmas and Halloween, Easter is one of my favorite holidays for crafting and baking. So far this year I have showcased a few of the Easter crafts I have made to decorate my home and in today's blog we're going to take a look at a frugal woman's attempt at gifts kids will hopefully love and enjoy. In light of the current economic climate, and rising gas prices, I found myself still wanting to do something for the kids in my boyfriend's family, but I was lacking the funds to do as I did last year when I put together gift bags for each child. Simple solution? Paper mache baskets! I had the newspaper on hand and made the paper mache paste using ingredients I already had in the kitchen. (See previous blog post for the paper mache recipe I used.)

My first attempts fell kinda flat, but as I rummaged through my craft closet I found lots of pretty ribbon and lace with which to fancy up the simple homemade baskets. I printed vintage images from the internet and used crafting foam as a sort of frame for each vintage image. I painted the baskets in varying pastel colors, attached the foam framed images, and topped each basket with ribbon and/or lace. I used simple floral wire for the handles. Take a look at the finished baskets. (*Note: I can't take credit for the little boxes beside each basket. Those are from Martha Stewart and anyone can get the templates here http://www.marthastewart.com/article/vintage-postcard-treat-box -- I did find that the slide box was a little big for the sleeve. You will want to experiment with one before taping, or gluing, all the pieces together. I made the later mistake so my boxes are little lopsided. I found the calculations slightly off, but they are still cute.)

Addie and Hannah's baskets.


Colston and Brooklynn's baskets.
Brooklynn and Luke's baskets.
Top view with name tags made on the Cricut.
In each basket I'm putting a Funfetti cupcake and sugar cookies with a chocolate candy coating. In the small boxes I put Easter grass and a few jelly beans. I hadn't originally intended to make the boxes, but they were so cute I couldn't resist. I also didn't anticipate them not fitting in the paper mache baskets. lol So the boxes will be handed out separately. I was also going to include mini-cupcakes in the basket, but as you can see they are quite small. My ambition was bigger than the actual baskets. :) If the kids want baby cupcakes they can, of course, enjoy them separately as well.

I actually spent the better part of the Easter Eve evening baking. Following is a sample of the baked goods I made in the span of four hours.

Big Spring Funfetti cupcakes topped with Spring Funfetti frosting and sprinkles baked in paper cups and with picks from The Dollar Tree.

Small Spring Funfetti cupcakes with vanilla frosting, confetti sprinkles, and baked in small Easter baking cups from The Dollar Tree.


                                          Toll House stamped sugar cookies with white chocolate (colored with food coloring) candy coating back.


Strawberry Poke-It Cake. Easy and delicious. Bake any white cake as directed. Poke with holes using the handle of any spoon. Mix Strawberry Jell-O according to the package. While cake is still warm pour Jell-O mixture over cake. Cover with small Cool Whip and refrigerate. Yum-O.


Another picture of the boxes made from the Martha Stewart template and filled with Easter grass and jelly beans.


So this is how one frugal woman prepared for the Easter holiday. I hope the kids enjoy their baskets and I hope the adults enjoy some of the treats I baked. I realize I've baked enough to feed a small army and I remember vividly how I used to roll my eyes at my mother when she did the same so many years ago. Now that I'm older I find enjoyment in doing for others, especially the kiddos, so I hope everyone enjoys my contribution. I admit that I actually enjoy slowly morphing into my mother. Never in a million years would I have thought I'd be doing as my mom always did when it comes to holiday preparation. I guess it's suffice to say she can now laugh at me and say, "I told you so." Because she did. She always said someday I would enjoy doing for others. So it is true... your mother is always right. Now this little bunny has to hop on to bed to enjoy the festivities later today. *hop hop hop* Enjoy your Blessed Easter Sunday!

Tuesday, March 29, 2011

Paper Mache Massacre

Paper mache is a simple craft that can turn any day into a craft extravaganza. All you need is flour, water, newspaper, and an imagination. I recently saw a paper mache basket at a gift shop selling for $15.00. Seriously? $15.00? I hadn't tried my hand at paper mache since high school, but a quick internet search produced several recipes and the easiest one to create was a no cook recipe using flour, water, salt, and a little pinch of cinnamon. The flour and water (one part flour to two parts water) create the paste while the salt (a couple tablespoons) will deter mold. The purpose of the cinnamon? Merely sensory. The cinnamon provides a pleasant smell to the otherwise bland paste.

With little preparation I found myself sitting at my kitchen table ready to mache. I mixed up the homemade glue, found a couple molds for my baskets, ripped up last week's edition of The Mountain Eagle, and I was ready to craft. At least I thought I was ready to craft. Three days in and I've found paper mache a lot messier than I remember and it's been a lot of trial and error... more error than anything. Oops!  :)

Bear in mind that these Easter baskets are a work in progress, an experiment that I will tweak as time goes on. The first run provided a couple rough looking baskets, and while the rough edges can definitely be appreciated from an artsy stand point, I'm sure as I play with the mache I will find a better technique to create a more flawless look. Then again there's always sandpaper which absolutely can be used on paper mache. It's dries a lot stronger than one might think. Shall we look at some steps?


Make sure when you mix your homemade paper mache paste that the mixture is as smooth as possible. I used my handy whisk to remove any remaining lumps. You want the mixture to be thinner than glue and quite runny. Play with the recipe and find the consistency that is best for you. One of the molds I used was an old terracotta flower pot. I covered the pot in a thin layer of petroleum jelly to make the paper mache cast easier to remove.

The second mold I used was a small metal pail. Again I covered the pail in a thin layer of petroleum jelly. Ideally you should only do one layer of paper mache at a time. The first night I allowed the layer to dry overnight, but I realized that process was going to take forever and I devised a plan.....

I took the molds and laid them on top of our electric heater. You definitely don't want to leave them unattended as paper and heat can create fire, but I monitored the molds and before I knew it the new layers were completely dry! Think about it... both terracotta and metal are conductors of heat so laying them on top of the heater basically "baked" the paper mache layers.  Pretty neat right?

Even with the small layer of petroleum jelly on the molds the baskets still needed to be slit down the back for easy removal. Once the baskets have been removed from the molds you simply take a few more layers of newspaper to close the cut. These baskets are 4 layers thick and as you can clearly see they stand on their own and hold their shape quite well. Now all that's left to do is decorate the baskets and surprisingly this has been the trickiest part for me.

First I painted the baskets in pretty pastel colors. The first two I painted baby blue and pale pink. Don't they look like little lampshades while hanging over my candle sticks to dry?   :)

Hmmm. I'm very undecided about them. I guess it's "cute" but it's not what I was looking for. Of course, this is only my first and a quick shopping trip may produce some new ribbon and embellishments. I used what I had on hand and I can't say I'm feeling it very much. The handle is wire, but it needs something... ribbon? flowers? beads? Hmmm. I shall ponder it.

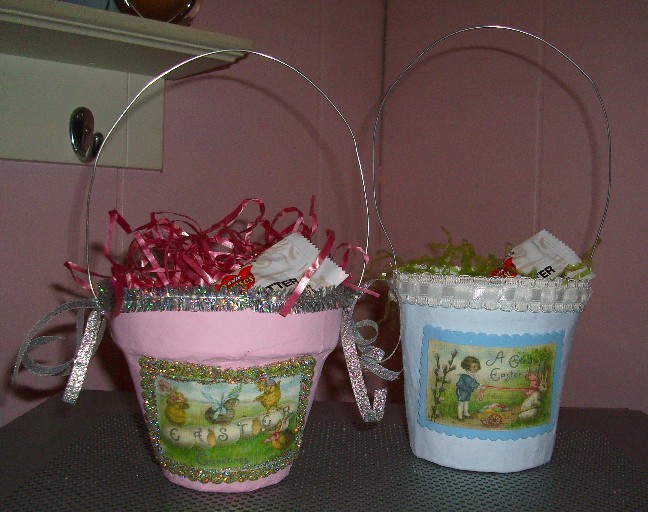
On my second attempt I decided to go a little more bare. Not so much glitter. Not too much frill. I'm still not feeling it. I definitely love my vintage Easter images... that part is working for me... but the overall effect is not quite pleasing me. I think this might be my first self-proclaimed craft fail. I'm on the fence.

Side by side. I'm still undecided. I don't love them, but I don't hate them. I feel they are "unfinished" but adding to them could border on tacky. Perhaps a craft shopping trip can inspire me. I need stuff, but I'm not exactly sure what kinda "stuff" I need. I thought this paper mache project was going to be a breeze. Uh... not so much. Anyone have any ideas? I'm open to suggestions. Help!